Difference of Kerosene/Paraffin Lamps and Moderator Oil Lamps
In my opinion, this is an important point, because at the beginning, when you are still relatively clueless, you stand in front of an antique, beautiful lamp and do not know what kind of lamp it is. Since many real Moderator lamps are offered on eBay (especially in France) and in stores as “kerosene/paraffin lamps”, I think it is important to point out clear distinguishing features. This distinction is also necessary because many old Moderator lamps were later converted into a kerosene/paraffin lamp by removing their inner system of leather piston, coil spring and moderating tube and mounting a real kerosene/paraffin burner on them.
For several decades after their invention, the Moderator lamps were the most popular oil lamps. Their great advantage over the even older piston pump lamps with clockwork was their robustness, as they were less prone to repair. You could get them relatively cheaply, made of simple brass sheet, or very imposing and expensive, e.g. made of painted porcelain. They were affordable by the majority of people. Nevertheless, they were gradually replaced by cheaper kerosene/paraffin lamps from the 1870s, but they were still produced and marketed until the end of the 19th century.
Moderator lamps appear quite often in eBay France and are declared as kerosene/paraffin lamps (lampe à pétrole in French) due to ignorance. The correct French name would be “lampe à huile” (= oil lamp). The layman can quickly be misled, especially since Moderator lamps for the most part look very beautiful and therefore arouse the desire to buy. If you only want to buy a beautiful, antique lamp for purely decorative purposes, you can safely accept the offer. However, if you want to buy a technically well-functioning lamp that you want to use from time to time, extreme caution is required with Moderator lamps! The complicated internal system is mostly no longer intact; the rancid/resinified remains of the vegetable oil, with which this lamp was previously operated, have now stuck many internal parts together, and the condition of the leather bulb is also extremely uncertain. Only a careful dismantling of the components and subsequent cleaning and repair can make the lamp usable again. The professionals who can do this are extremely rare. Therefore, be careful when buying Moderator lamps.
How the Moderator Lamp Works
Although I do not collect any Moderator oil lamps, I would like to briefly describe the inner workings of these lamps. I consider the Moderator lamp to be an epoch-making technical invention of the time (around 1830). However, I can hardly find any suitable literature that describes the finely adjusted Moderator technique in a clearly understandable way. In particular, the ingeniously conceived mode of action of the Moderator pin is nowhere plausibly explained. I have therefore undertaken to explain this invention to you with comprehensibly drawn diagrams. The only source that helped me was the website of Lothar Spaniol († 2011), whose family makes this valuable legacy of his available to lamp collectors even years after his death. I would like to express my sincere thanks to them.
Regardless of the external shape of the lamp, the Moderator technique concealed inside always consists of a strictly cylindrical metal cylinder, the width and height of which are adapted to the shape of the lamp, a rigid metal piston consisting of two metal discs located in the cylinder and carrying a rather stiff leather disc, the edges of which protrude about 1.5 cm from the piston and are turned downwards, a strong coil spring, the lower edge of which is attached to the piston, and two narrow tubes that interlock telescopically. The upper tube is attached to the burner, while the lower tube is attached to the piston. The part of the piston shaft protruding from the top of the neck of the lamp is shaped as a rack. The dimensioning of the leather disc is important: its protruding edges must be close to the inner walls of the metal cylinder so that the space below the piston is quite well insulated from the rest of the space above the piston.
To fill the lamp, pour oil through the open neck into the metal cylinder. The oil collects in the space above the piston. Then manually pull the piston upwards with the external turning key on the rack and hold it in this position. This compresses the coil spring and increases its pressure on the piston. At the same time, a vacuum is created below the piston, which pulls the edges of the leather disc slightly inwards from the walls of the metal cylinder and the oil flows from the upper space into the lower space until the space below the piston is filled with oil again, which takes a few minutes depending on the amount of oil filled. It is important to cover the upper opening of the burner with a finger so that no air from above can penetrate to the lower part of the reservoir with negative pressure, which would cause premature pressure equalisation there (scheme A in the following picture).
After filling, the turning key is released. The coil spring pushes the piston downwards and creates an overpressure below it, which presses the edges of the leather sleeve back against the metal walls. This hermetically seals the piston's lower chamber and the oil begins to flow upwards through the two telescopic tubes to the burner to burn (scheme B in the following photo). If too much oil reaches the top of the burner due to the excess pressure, the excess flows back into the metal cylinder. The special Moderator pin located in the lower telescopic tube (not drawn in the diagrams of the next picture) ensures that the amount of oil rising to the top of the burner remains fairly constant, regardless of the pressure of the coil spring (the mode of operation of the Moderator pin is shown in the picture after next).
When the oil is used up after a few hours, you have to pull the piston up again with the turning key and fill in oil again.
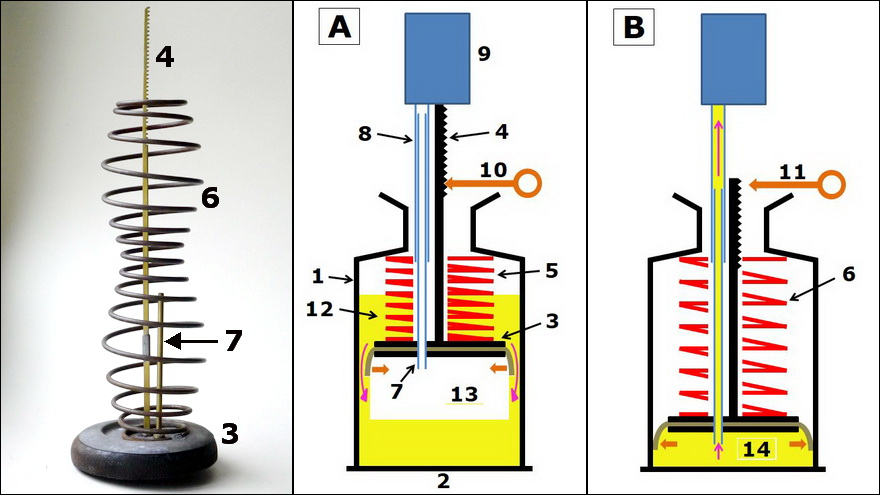
Parts of the Moderator system and schematic mode of operation
Left: Coil spring, piston with leather disc, piston shaft with rack and the lower telescopic tube of an elongated Moderator lamp
Middle: Filling the metal cylinder (scheme A; see above for explanation)
Right: Transporting the oil to the burner (scheme B; see above for explanation)
Note: The Moderator pin is not shown in the diagrams. The diagrams only show the inner workings of a Moderator lamp; the outer shape of the lamp made of porcelain, ceramic or metal sheet is not indicated in the diagrams.
Explanations for the schemes in the picture above:
1 = Strictly cylindrical metal vessel made of sheet iron (bottom still open at the beginning for inserting the other Moderator parts)
2 = Lower end plate, soldered to the metal cylinder after the inner parts have been inserted into the metal vessel from below
3 = Piston with integrated leather disc with protruding edges
4 = Piston shaft, formed as a rack at the top
5 = Coil spring (here compressed; piston pulled upwards)
6 = Coil spring (here relieves and pushes the piston downwards)
7 = Lower telescopic tube, connected to the piston
8 = Upper telescopic tube, connected to the burner
9 = Argand burner
10 = Turning key on the rack to raise the piston
11 = Turning key released; spiral spring now pushes down the piston
12 = Oil, filled into the lamp through the upper neck of the metal cylinder
13 = Vacuum (oil flows down the sides from top to bottom and fills the space under the piston)
14 = Over-pressure (oil flows upwards through the telescopic tubes to the burner)
The next picture serves solely to visualise how the Moderator pin works. To do this, however, I now had to draw the telescopic tubes (7 and 8 in the above picture) extremely wide. The upper telescopic tube is firmly connected to the burner and therefore fixed in its position. It is wider in diameter than the lower telescopic tube, which in turn is only connected to the piston and therefore moves up or down together with the piston. In this tube is the Moderator pin as a thin, long pin whose upper part becomes conically wider towards the top, but without quite reaching the diameter of the tube. This pin (drawn in green in the diagrams) is loosely inserted in the lower tube and does not move together with it. A piece of leather (c in the picture) is glued to the bottom of the metal reservoir to prevent further lowering of the piston and thus deformation of the protruding edges of the leather disc.
I have drawn three different positions of the piston in the picture:
Diagram 1: Here the piston is pulled far upwards; the pressure of the coil spring on the piston is very strong. As a result, there is a high overpressure in the oil reservoir. The widest upper part of the Moderator pin is now in the narrow lower telescopic tube. As a result, the passage "a" for the oil pressed upwards is smallest. Despite the large overpressure, less oil reaches the top of the burner.
Diagram 2: About half of the oil is used up. Half of the piston and thus also the lower telescopic tube have come down. The coil spring is somewhat relieved and therefore exerts less pressure on the piston; hence the excess pressure in the oil reservoir has become correspondingly lower. The upper edge of the lower telescopic tube is now approximately in the middle of the conical part of the Moderator pin. As a result, the passage "a" is now larger and allows correspondingly more oil to pass through to the burner.
Diagram 3: The oil is almost used up. The piston has come down very far and the coil spring has relieved itself to the maximum. The overpressure in the oil chamber has further reduced. The upper edge of the lower telescopic tube has already lowered so far that it is now in the narrowest area of the Moderator pin. The passage "a" is largest here and allows a larger amount of oil to pass.
The overpressure in the oil chamber and the width of the passage "a" are inversely proportional to each other. At the highest overpressure, the passage "a" is smallest; and at the smallest overpressure, the passage "a" is largest. As a result, approximately the same amount of oil always arrives at the top of the burner.

The mode of operation of the Moderator pin (a = size of the oil passage depending on the position of the lower telescopic tube; b = Moderator pin; c = leather tampon at the bottom).
Moderator Lamps with a Long Neck
Well, how can you externally distinguish the Moderator lamps from the kerosene/paraffin lamps if the seller wrongly declares them to be kerosene/paraffin lamps? The distinction at many conventional Moderator lamps is quite simple: They very often consist of a long baluster-shaped vase that narrows towards the top, and the typical Moderator burner, which is easy to distinguish from a conventional kerosene/paraffin burner, sits at the top of this vase. Since the spring described earlier transports the oil upwards at a constant speed, this vase neck can be quite long. If you were to put a kerosene/paraffin burner on top, its wick would have to be extended very far down in order to be immersed in the kerosene/paraffin. The length of the wick between the kerosene/paraffin and the burner would be too long; the flame would soon burn very poorly because not enough kerosene/paraffin can crawl up due to the very long wick.
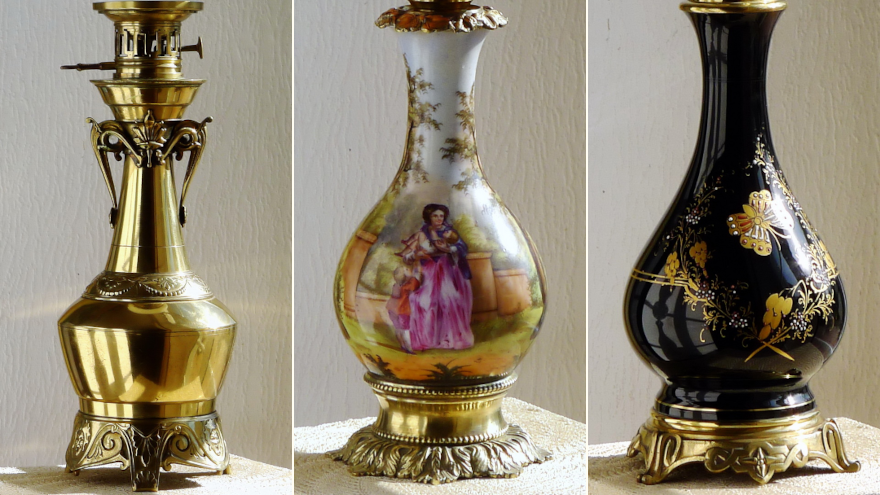
Typical Moderator lamp form with a long neck (here shown partly without burner)
The most important distinguishing feature is therefore the lack of a reservoir for kerosene/paraffin immediately below the burner, as soon as the vase has a long neck that tapers towards the top. Unfortunately, such long-neck Moderator lamps were often electrified by sawing off the top of the burner through its center and attaching an electric socket for light bulbs. These lamps can therefore no longer be returned to their original purpose; as one English collector aptly put it, they are downright “electrocuted” (meaning “electrically executed”). Here, however, there is still a good opportunity to create good-looking kerosene/paraffin lamps from these electrified lamps by neatly removing the electrical parts and also outstanding Moderator burner parts, and putting on a kerosene/paraffin reservoir that fits in size, style and colour. My lamps L.316 and L.317 are good examples of this. Even former Moderator manufacturers have made use of this possibility of conversion and regularly offered lamps that have been modified for burning with kerosene/paraffin. Shortly after the cheaper kerosene/paraffin lamps entered the market, the manufacturers of the Moderator lamps were forced to switch their production to kerosene/paraffin lamps. But since they either still had enough of the elongated vases of the Moderator lamps in their warehouses, or their elongated, elegant shape was quite popular and in demand, they quickly installed a reservoir of the right material and colour between the elongated, narrow vase and the new kerosene/paraffin burner. Now you could use the new burner with a short wick. The result was an elegant, tall kerosene/paraffin lamp that was reminiscent of the popular, but expensive Moderator lamps, and yet had the more modern type of burner.
Moderator Lamps with Cylindrical Shapes
Another very distinctive shape of the former Moderator lamps consists of two cylindrical bodies. The lower cylindrical part of approx. 6-7 cm height (which also serves as a base) is compact and wide, while the upper cylindrical part is longer and narrower. The entire lamp looks completely different from the elegant "long-neck lamps" described above. These lamps usually consisted of more or less elaborately embossed sheet brass and were therefore affordable even for the less wealthy people. Of course there were also much more expensive specimens made of beautifully painted porcelain. This type of Moderator lamp has most often been subsequently converted to a kerosene/paraffin lamp by removing the internal Moderator parts and the Moderator burner and simply putting a kerosene/paraffin burner on top without adding a special reservoir. Indeed, the distance between the inner reservoir and the burner is now short enough for relatively trouble-free burning. But here, too, there are variants in which an additional reservoir has been added.
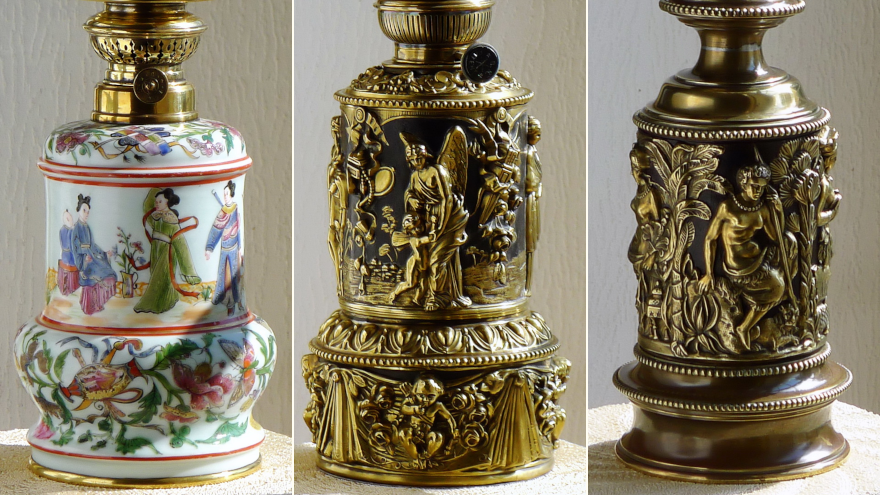
Variants of the shape from two quasi-cylindrical bodies made of porcelain or brass
In the past, these rather short Moderator lamps often had a matching additional stand, a kind of small table on a short, column-like base, often nicely decorated, which helped the relatively short lamp to a better height for lighting purposes. These bases have often been lost. Some of them appear alone on eBay France without the associated lamp. The next photo shows such a former Moderator lamp standing on its stand.
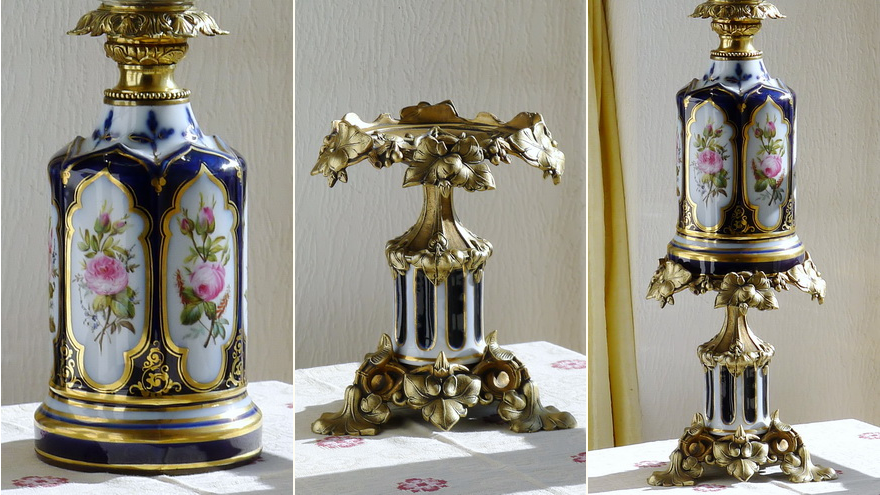
Moderator lamp with its stand
Other Shapes
Of course, there were also Moderator lamps, the shape of which deviated from the ones described here. There are cylindrical, spherical or vase-like lamps, even with handles, sometimes even two-piece lamps, which have been converted to kerosene/paraffin lamps with or without an additional reservoir.
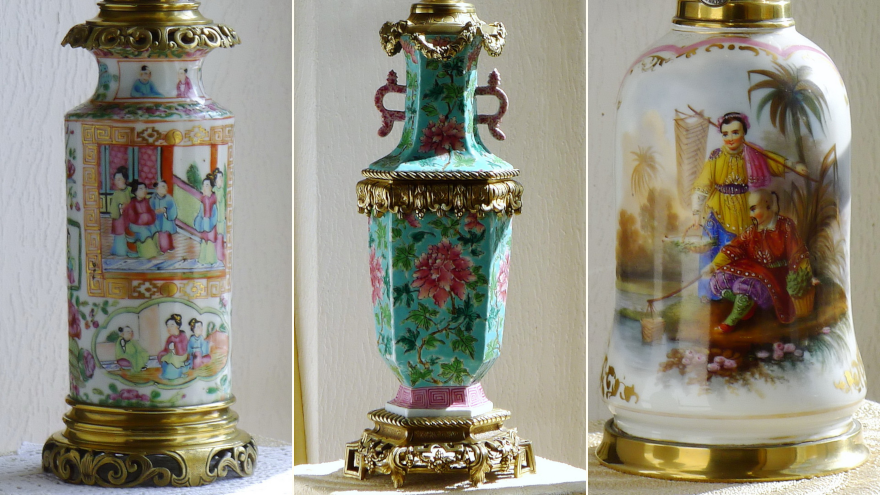
Diversity of shapes at Moderator lamps
Metal Sheet as Base End
Recognizing this type of former Moderator lamp is unfortunately not very easy. In addition to the characteristic shapes described above, the former Moderator lamp can also be recognized from the underside of the base. These lamps all have a sheet metal made of galvanized iron which is soldered to the underside of their base. This was necessary because the interior Moderator technology could only be attached from the wider, initially still open underside. After everything was properly attached, the underside was closed with a circular metal sheet by soldering it to the base. In order to remove the Moderator technique, this metal cover plate must of course be desoldered again. Some Moderator lamp manufacturers have provided these cover plates with their initials or company names.

Some company logos on the end plates of Moderator lamps
Moderator Burner
Another important point of differentiation is the burner. The burner of a Moderator lamp is surrounded on the outside by a cylindrical, ornamentally perforated and quite elaborately designed part made of cast brass or bronze. This ornate part has nothing to do with the actual burner; its only task is to hide the simple, long tube of the burner and to hold both the glass chimney and the glass shade. This decorated metal jacket has side recesses for two keys, which are used to wind the spring and to adjust the wick height. The parts typical for kerosene/paraffin burners, the "basket" and the "gallery" (see chapter Kerosene/Paraffin Burners), are missing in the Moderator burner, which itself, without the ornament of the casing jacket, consists of the simple, narrow, cylindrical tube of Argand burner and two keys protruding from it.
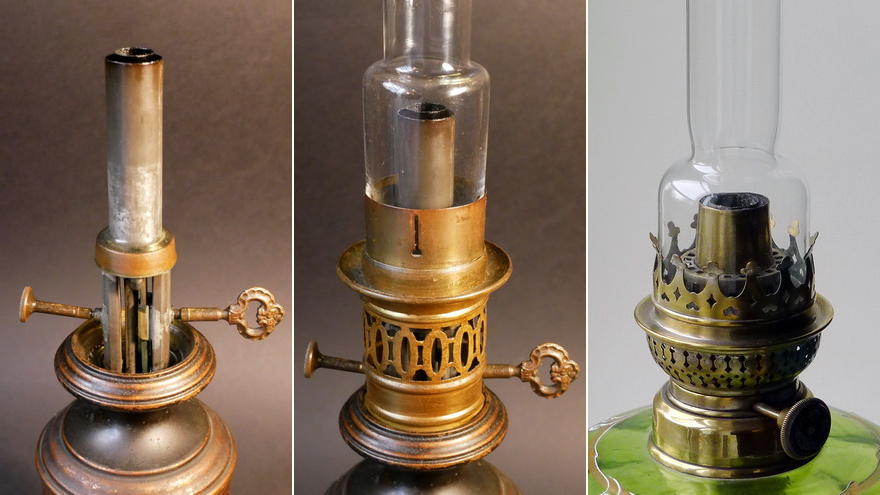
Differences between Moderator and kerosene/paraffin burners
Left: Moderator burner without ornamental mantle (photo by Ara Kebapcioglu)
Middle: Moderator burner complete with ornamental mantle and chimney (photo by Ara Kebapcioglu)
Right: Typical kerosene/paraffin burner (here a Kosmos burner)
Moderator Lamps Converted into Kerosene/Paraffin Lamps
As described above, an old Moderator lamp that has become unusable as such due to electrification or other occurrences (such as a metal reservoir that has become holey due to rust; completely resinous inner parts that can no longer be cleaned; a leather sleeve that has become stiff) can be converted into a kerosene/paraffin lamp. It is essential to pay attention to the following:
The first thing to do is to saw off the Moderator burner (if still present) together with the two keys as far as possible below the neck opening. The same applies if the lamp has been electrified before; here, too, everything that stands in the way of a new burner or font must be sawn off and removed.
In the case of long-necked Moderator lamps, a kerosene/paraffin font must necessarily be attached to the end of the neck so that the wick of the burner can be immersed in the kerosene/paraffin after a short distance. Without an additional font, the distance between the burner and the fuel - due to the long neck - would be too long.
Short Moderator lamps with cylindrical bodies can be converted both without and with extra font, as now the distance between burner and fuel would be short enough. With the variant without extra font, however, one must make sure that a) the inner metal reservoir has not rusted and thus become leaky; b) there are no more oil residues in the reservoir.

Options for converting Moderator lamps to kerosene/paraffin operation
Left: Conversion of the long neck lamps
Right: Conversion of the short lamps
However, I would like to point out one difficulty: Neither a kerosene/paraffin burner nor an additional font will fit easily into the open neck of a Moderator lamp. You have to have certain spare parts that fit the dimensions of the neck opening of the lamp. If you only want to fit a kerosene/paraffin burner, you should solder the necessary font collar to the Moderator neck. It becomes more difficult if you are forced to put on a font; for this you need a suitable undermount receiver with an internal thread as the counterpart of the font undermount (see The Font - Font Collar and Metal Undermount), which you can solder into the neck together with additional brass rings if necessary. If you do not have these spare parts at hand, you will have to plaster the entire font with the undermount in the neck, with the disadvantage that you will not be able to unscrew the font.


